Monday, July 30, 2018

Group Office 6.3 released!

I’m proud to announce the release of Group-Office 6.3. This version is fully loaded with new features, performance enhancements and a brand new look and feel:

This is a first step of many towards a new GroupOffice platform. The new platform will have a standardised API, a better user experience and a responsive interface for optimal display on any device.

Fully open source

We’ve included all the synchronisation features in the open-source version as we've changed our view on our open source model. From now on GroupOffice Groupware will be fully open source.
We'll provide a solid open source groupware platform which:
  • Allows everyone to build their own modules 
  • Everyone to contribute to a secure and stable open source platform 
  • Flexibility in customising the platform
On top of this platform Intermesh we'll provide additional business oriented modules such as project management, billing and time tracking.

We'll also offer support contracts.

What’s new?

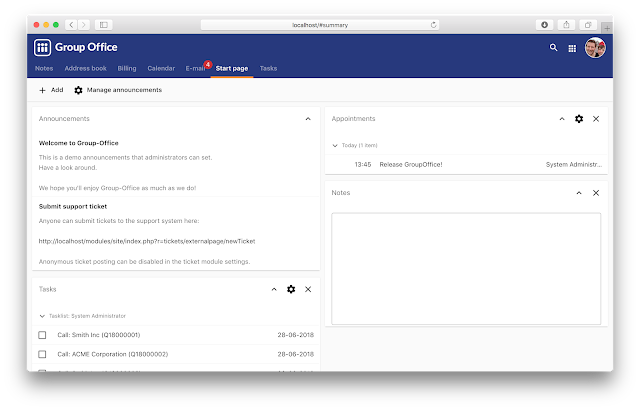
New theme

A brand new theme was made for this release which is also very easy to customise:


Core enhancements


  • Next to iOS and Android there’s full Windows 10, MacOS and Linux support for syncing e-mail, files, calendar and contacts.
  • Performance enhancements with our new JMAP based backend API and enhanced web client builder.
  • Two factor authentication
  • Improved installation procedure

System settings

The GroupOffice configuration file became very large. There were so many parameters so we felt it was time to bring it to a minimum with just the database settings in the file. Everything else will be configurable with the new “System settings” dialog:


Responsive

The interface supports responsive design now. This is still a work in progress but we’ve started using this in the Notes and E-mail module. They’re now both functional on tables and mobile touch devices.


Documentation

We’ve started with new documentation manuals to replace the wiki. You can find them here:

https://www.group-office.com/documentation.html

Docker

We fell in love with Docker. We’re using it as our development environment and we’ve also built an image for production use. You can find instructions in our installation manual.

Time to get started!

We hope that we’ve convinced you to upgrade to version 6.3 or start using this new version. You can find upgrade and installation instructions here:

https://groupoffice.readthedocs.io

If you need help Intermesh also provides support and tailor made modules. Contact us for more information at info@intermesh.nl

You can also try our demo:

https://demo.group-office.eu


Tuesday, June 26, 2018

Upgrading Group-Office on a Synology using Docker

Previously, I've written a post about installing Group-Office on a Synology NAS using Docker. Here's a writeup about how to update Group-Office.

1. Login to the Synology NAS web interface.
2. Launch Docker from the Applications menu.
3. On the "Containers" tab, stop the Group-Office container.
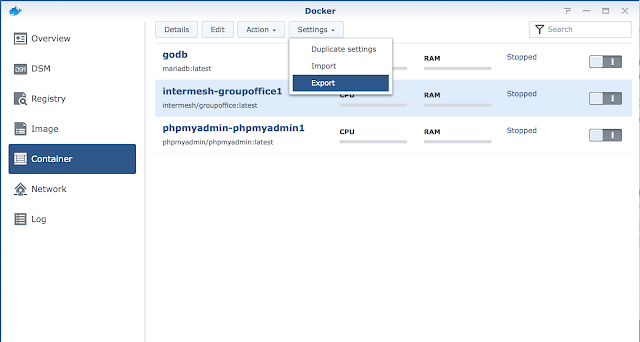
4. Select it and choose "Settings" -> "Export".


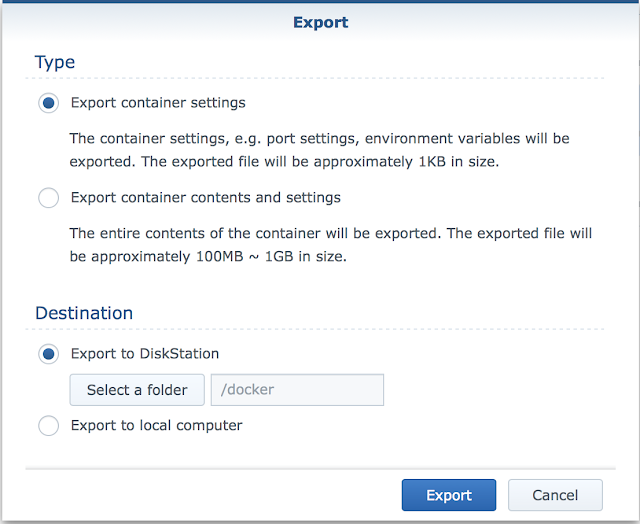
5. Save the settings to a folder on the NAS:


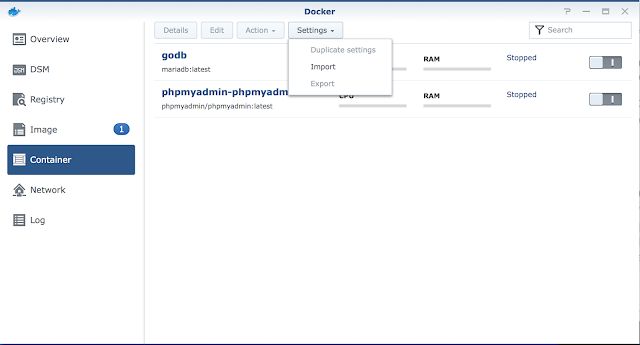
6. Delete the group-office container (Don't worry, your data will still be on the NAS).
7. Delete the intermesh/groupoffice image on the "Images" tab.
8. Download the new intermesh/groupoffice image on the "Registry" tab and wait for it to finish in the "Images" tab.
9. Import your previously saved settings file in the "Containers" tab:


10. Launch the updated container
11. Visit the Group-Office web page and the upgrade process should start.
12. Click continue to login to your updated Group-Office!


Monday, May 14, 2018

Install Group-Office on a Synology NAS with Docker


This is a walkthrough on how to install Group-Office on a Synology NAS with docker. Make sure you've installed Docker via the Synology package center.
  1. Launch Docker
  2. Go to the “Registry” tab and search for “mariadb”. Double click to download the latest:

  3. Search for “groupoffice” and install the latest “intermesh/groupoffice”:

  4. Go to the image tab and double click “maridb” to create a container called “godb”.
  5. Click on “Advanced Settings” and set in the “Environment” tab:
    MYSQL_USER=groupoffice
    MYSQL_PASSWORD=groupoffice
    MYSQL_DATABASE=groupoffice
    MYSQL_ROOT_PASSWORD=groupoffice

  6. Create a folder for the “/var/lib/mysql” volume in the “Volumes” tab.

  7. Click “Apply” to create the container.
  8. Now double click the “intermesh/groupoffice” container and go to the “Advanced Settings”.
  9. In the “Links” tab create a link to “godb” and call it “db”:
  10. Go to the "Volume" tab and mount a folder on "/var/lib/groupoffice":

  11. Review the “Environment” tab. Set apache server name and email:

  12. Check the port settings and launch your browser to the host and port. You should see the Group-Office installation screen. If you get the message "Please create a writable config.,ini" file then either /var/lib/groupoffice is not writable or the database connection can't be established. Please review those if you get that message.
  13. Finally you must add a scheduled task for GroupOffice. Go to Control Panel -> Task Scheduler on the Synology UI and choose Create -> Scheduled Task:


    Configure this command:

    /usr/local/bin/docker exec --user www-data intermesh-groupoffice1 php /usr/local/share/groupoffice/cron.php
  14. You're up and running!

Install SSL certificate

You probably need to install an SSL certificate too. This can be done easily. I've generated a Let's encrypt certificate at Control Panel -> Security:


  1. Right click on the certificate and choose "Export certificate". 
  2. Extract those files in a folder on the synology NAS called "docker/certs".
  3. The add a file called "apache.conf" and put this in:

    SSLCertificateKeyFile /etc/ssl/groupoffice/privkey.pem
    SSLCertificateFile /etc/ssl/groupoffice/cert.pem
    SSLCertificateChainFile /etc/ssl/groupoffice/chain.pem
  4. The folder on Docker should look like this:
  5. Edit the Docker container settings of groupoffice and mount this folder at "/etc/ssl/groupoffice"
  6. Check the SSL port settings and start the container. You should now have SSL!

Install license files

If you purchased additional modules from Intermesh you can install the licenses by mounting them in the Volume tab: